
Fabric facing for a knitted button band
In this tutorial, I walk you through the steps to create a fabric facing for Bandit and Baby Bandit. A sewing machine is optional for the buttonholes, and you only need very basic hand-sewing skills for the rest of the facing.
Adding a fabric facing to the button band of a hand-knit sweater makes for a clean, stabilized edge that both looks and wears better than the knitted band on its own. While hand-knit fabric is extremely stretchy and floppy, a woven fabric — like a cotton lawn or a quilting cotton — has no stretch and holds its shape extremely well, making it perfectly suited for the part of a garment that is constantly being tugged and manipulated in day-to-day wear. It’s also a great place to add some personality to your sweater — I’ve used a beautiful Liberty of London print from EWE Fibers to add a bit of joy to the inside of my cardigan.

You can add a fabric facing to one or both fronts of your cardigan. Some makers prefer to add the facing only to the side with the buttons, providing a more sturdy backing for anchoring the buttons when they sew them on. I personally prefer to have both sides matching, which helps the cardigan fronts look even and prevents the buttonholes from stretching with wear.
Supplies:
scissors
chalk/pencil for marking your fabric
ruler
lightweight, sturdy strip of fabric (quilting cotton or cotton lawn is best) at least 4”/10cm wide and at least 1”/2.5cm longer than the finished button band of your cardigan
lightweight fusible interfacing at least 2”/5cm wide and at least as long as the finished button band of your cardigan
iron
matching thread
sewing needle
NOTE: You should completely finish your cardigan — including the crochet edging on the button bands and wet-blocking the full sweater to measurements — before you measure for the facings.
1. Cut your facings
Lay your cardigan on a flat surface and measure the full length of each button band from the top edge of the collar to the bottom edge of the hem, being careful not to stretch or manipulate the fabric. If the button bands are slightly different lengths, go with a measurement in between the two.
Cut 2 strips of fabric 2”/5cm wide and the length of your finished button band PLUS 1”/2.5cm.
Cut 2 strips of fusible interfacing 1”/2.5cm wide and exactly the length of your finished button band.

2. Attach fusible interfacing, fold & iron edges
Follow the instructions for your fusible interfacing to fuse one strip to the center of the wrong side of one strip of fabric facing. Fold the long edges of the fabric facing .5”/1.25cm over the fusible interfacing to meet in the middle and iron in place. Fold each of the short edges over .5”/1.25cm to the wrong side and iron in place.
Repeat for second facing.


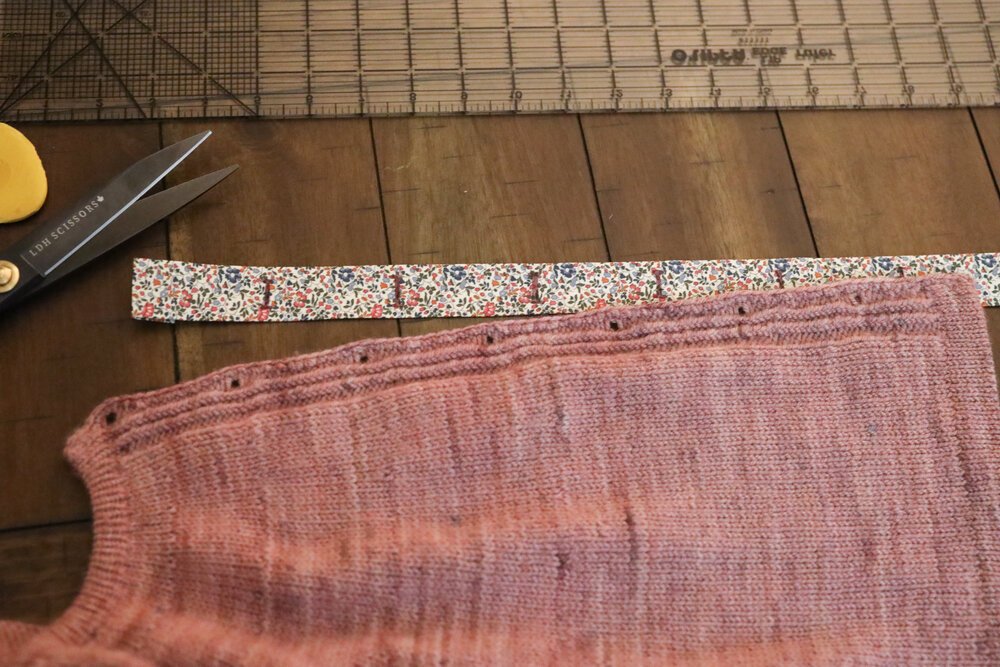
3. Mark & sew buttonholes
With your cardigan laying open on a flat surface, put one facing carefully underneath the right front button band. Use fabric chalk, a pencil, or an erasable fabric pen to mark each of the buttonholes on your facing.
Follow the instructions for your sewing machine to sew horizontal buttonholes in each of the marked places. Alternatively, you can work hand-sewn buttonholes, as Anne did for Nora’s Baby Bandit (pictured with the mustard-colored facing below).


Hand-sewn buttonholes for baby Nora’s cardigan.
4. Attach facings to cardigan
Pin one facing in place along the entire length of the button band, being sure that each fabric buttonhole lines up with the knitted buttonhole beneath it. Use plenty of pins to really secure the facing and prevent the knitted fabric from stretching as you work and distorting the button band. Whip stitch the facing all along the edges of the button band. With minimal stretching and tweaking, you should be able to get the 1” facing to perfectly match the 1” button band all the way down the front.
Repeat for second button band.
If your button bands look at all warped, you can gently steam them with the iron once you have finished sewing.
Attach buttons to the left front.

And that’s it!
Unless you are now inspired to sew clothes to match your button band, as we were… I am wearing a self-drafted patchwork dress, Genevieve and Nora are wearing the Wiksten Smock, and Nora is wearing the Wiksten Harem Pants. Fabrics are from EWE Fibers.


I hope you love your hand-finished button band and your Bandit cardigan! Happy making!!!